Overview
The Brightcove Native SDK for iOS/tvOS provides a variety of sample apps to help you get started with your own implementations. For a complete list of samples, see the following:
If you are new to the Brightcove Native SDKs, check out the Getting Started with the Native SDKs videos.
Tools needed
You will need the following tools installed on your computer to run the sample apps:
-
Xcode 15 or later
Xcode is an integrated development environment (IDE) used to create software for macOS, iOS, watchOS and tvOS. -
(Flutter and React Native samples only) CocoaPods 1.0 or later
Most samples consume the Brightcove SDK via Swift Package Manager and require no extra tools. The
PlayerUI/FlutterandPlayerUI/ReactNativesamples still use CocoaPods for their iOS integration and need CocoaPods installed.
Sample types
In the player samples for iOS/tvOS repository, you will find samples for the following platforms:
-
iOS - A mobile operating system for Apple devices, including iPhone, iPad and iPod
-
tvOS - An operating system for Apple TV
The samples are written in the following languages:
-
Objective-C
Objective-C is a superset of the C programming language and provides object-oriented capabilities and a dynamic runtime. So, it adds syntax for defining classes and methods. -
Swift
Swift is the new open source programming language for iOS, Mac, tvOS and Apple watch. It is more intuitive to use and is similar to JavaScript. It can be added to existing Objective-C code.
Opening a sample
The iOS/tvOS sample apps support the latest version of the Brightcove Native SDK and plugins.
Most samples consume the Brightcove Native SDK and its third-party dependencies via Swift Package Manager; Xcode resolves the packages automatically on first build, so no extra steps are needed before opening the project. The exceptions are PlayerUI/Flutter and PlayerUI/ReactNative, which use CocoaPods for their iOS integration.
Most samples (Swift Package Manager)
- Clone or download the Player samples for iOS/tvOS to your computer.
- Open the sample's .xcodeproj file in Xcode.
- Xcode resolves the Swift Packages on first build. Wait for "Fetching Package Dependencies" to complete in the Xcode title bar.
The IMA, DAI, FreeWheel, Pulse, and Omniture samples depend on third-party advertising or analytics SDKs that are not redistributed by Brightcove. Read the sample's README.md for any additional manual steps (for example, dropping in the FreeWheel AdManager xcframework retrieved from your FreeWheel account).
Flutter and React Native samples (CocoaPods)
- If you don't already have CocoaPods, download and install the latest version.
- Clone or download the Player samples for iOS/tvOS to your computer.
- Navigate into the sample's
ios/folder in the Terminal and runpod install.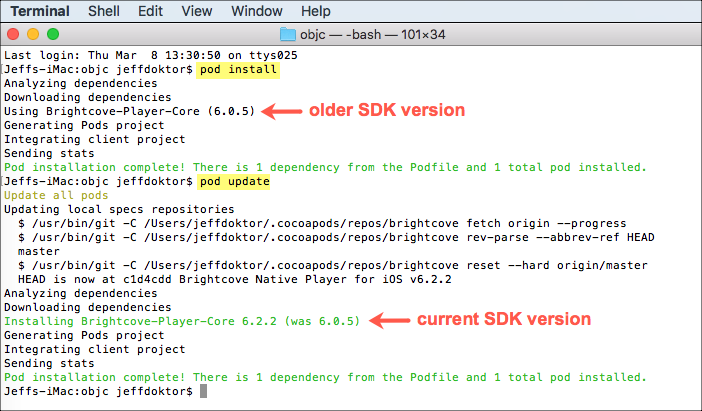
Run pod install - Open the generated .xcworkspace file in Xcode.
Running the sample apps
The sample apps can be run using the following:
- Xcode simulator
- Xcode using a physical device connected to your computer
- The device must run iOS 14 or later (tvOS 15 or later for tvOS samples).
- On your device, make sure USB debugging is enabled.
To run a sample app, follow these steps:
- If you are new to Xcode, review the Apple developer documentation.
- In Xcode, open the sample's .xcodeproj (or .xcworkspace for Flutter and React Native samples).
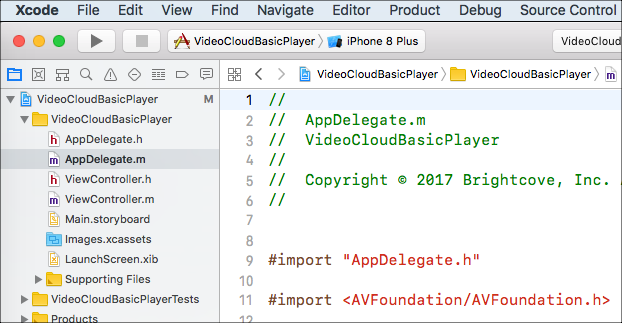
Project in Xcode - Open the main view controller source file. You can run the sample with the provided values, or replace them with your own Video Cloud account ID, video ID, and policy key.

Customize values - In the toolbar's active scheme menu, the sample's project should be selected.

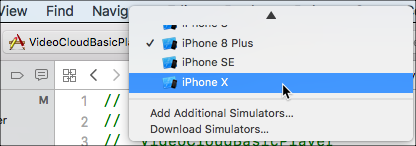
Project selection - Expand the run destination dropdown. If you have a device connected to your computer, you should see it listed here. Select your device or a simulator.
Select device or simulator version - Select the Run button.

Run the project - You should see the app running on your device or in the simulator.

Xcode simulator
Debugging
Xcode provides debugging tools that allow you to set breakpoints, examine variables and evaluate expressions at runtime. To debug your app, do the following:
- In Xcode, locate the line of code where you would like to pause execution.
- In the left gutter for the line of code, click to add a breakpoint. Double click to edit a breakpoint. Right clicking on the breakpoint gives you options including deleting a breakpoint.

Breakpoint - Select the Run button to start execution.
Run the project -
When execution pauses at your breakpoint, you will have several options to inspect variables and expressions, as well as stepping through/over/into lines of code.

Pause execution at breakpoint