Table of contents
Advertising
Analytics
Content security (DRM)
Live streams
Playback
- Detecting Network Bandwidth
- Getting the ExoPlayer instance
- Offline playback with DRM
- Paging with the Playback API
- Playing local videos
- Setting the buffer size
- Setting the peak bitrate
- Setting the playback rate
- Setting VR Goggles mode for 360° videos
- Start playback in the middle of a video
- Start playback when in view
- Swapping videos
Player controls
Video content
Customizing controls for Android TV
You can add buttons to the control bar for either devices or Android TV. The steps below walk you through adding a fullscreen button to the control bar for Android TV:
- Open the Customized Controls sample app. We'll use this as a starting point. Review the sample app's README file for details about customizing player controls.
- Open the res/layout/land/my_media_controller.xml file in Android Studio.
- Copy the
Buttonelement for thefull_screenbutton. The code should look similar to this:<Button style="@style/BorderlessButton" android:id="@id/full_screen" android:padding="4dp" android:layout_gravity="center_vertical" android:layout_height="wrap_content" android:layout_width="wrap_content" android:visibility="visible" android:text="@string/brightcove_controls_enter_full_screen"/> - Open the res/layout/my_tv_media_controller.xml file in Android Studio.
- Paste the copied
Buttonelement into this layout file. The position of the elements determines their position in the control bar. - Scroll to the top of the res/layout/my_tv_media_controller.xml file. Make sure the style property is set to
@style/BrightcoveControlBar.TV.Custom. The code should look like this:<?xml version="1.0" encoding="utf-8"?> <com.brightcove.player.mediacontroller.BrightcoveControlBar xmlns:android="http://schemas.android.com/apk/res/android" xmlns:bmc="http://schemas.android.com/apk/res-auto" xmlns:tools="http://schemas.android.com/tools" tools:ignore="Overdraw, InconsistentLayout" android:id="@+id/brightcove_control_bar" android:background="@color/bmc_background" android:layout_width="match_parent" android:layout_height="wrap_content" android:padding="8dp" android:orientation="horizontal" android:layout_gravity="bottom" style="@style/BrightcoveControlBar.TV.Custom"> - Open the res/values/styles.xml file in Android Studio.
- To the
styleelement with anamevalue ofBrightcoveControlBar.TV.Custom, add anitemelement for the fullscreen button and set it totrueto display it.<style name="BrightcoveControlBar.TV.Custom"> <item name="brightcove_vr_mode">false</item> <item name="brightcove_full_screen">true</item> </style> - That's it. Run the sample app on an Android TV physical or virtual device. You should see the fullscreen button in the control bar.

Fullscreen button
Fullscreen mode
You can manage fullscreen mode using code.
-
Here is the code to set fullscreen mode:
brightcoveVideoView.getEventEmitter().emit(EventType.ENTER_FULL_SCREEN); -
Here is the code to exit fullscreen mode:
brightcoveVideoView.getEventEmitter().emit(EventType.EXIT_FULL_SCREEN);
Getting duration for live streams
To get the duration for a live stream, you can use the MAX_POSITION. This gives you the largest seekable position for a live stream (ie., the furthest you can drag the scrollbar). Your code should look similar to this:
brightcoveVideoView.getEventEmitter().on(EventType.PROGRESS, new EventListener() {
  @Override
  public void processEvent(Event event) {
  int duration = (int) event.properties.get(Event.MAX_POSITION);
  }
});
Detecting Network Bandwidth
There may be use cases where you need to detect the network bandwidth within your app, such as when working with downloads.
To detect bandwidth, the Native SDK for Android uses the BandwidthMeter class provided by ExoPlayer. Our PlayerBandwidthMeter class uses the BandwidthMeter class and provides the getBitrateEstimate method returning the estimated bitrate.
For details, see the following:
- Brightcove PlayerBandwidthMeter class
- Post: Simplified bandwidth meter usage
- ExoPlayer BandwidthMeter interface
- ExoPlayer BandwidthMeter.EventListener interface
Here's an example:
ExoPlayerVideoDisplayComponent exoPlayer = (ExoPlayerVideoDisplayComponent) brightcoveVideoView.getVideoDisplay();
exoPlayer.getBandwidthMeter().addEventListener(myHandler, new BandwidthMeter.EventListener() {@
	Override public void onBandwidthSample(int elapsedMs, long bytesTransferred, long bitrateEstimate) {}
});
Getting the ExoPlayer instance
There may be times when you need to get the ExoPlayer object to modify properties which are not exposed through the Brightcove Native SDK. An instance of this object is created after the video is set. So, you need to wait for the DID_SET_VIDEO event.
You can get the ExoPlayer instance by doing the following:
// Get the ExoPlayer instance
eventEmitter.on(EventType.DID_SET_VIDEO, new EventListener() {
  @Override
  public void processEvent(Event event) {
    VideoDisplayComponent videoDisplayComponent = brightcoveVideoView.getVideoDisplay();
    if (videoDisplayComponent instanceof ExoPlayerVideoDisplayComponent) {
      // Get ExoPlayer
      ExoPlayer exoPlayer = ((ExoPlayerVideoDisplayComponent) videoDisplayComponent).getExoPlayer();
      if (exoPlayer instanceof SimpleExoPlayer) {
        // Get SimpleExoPlayer
        SimpleExoPlayer simpleExoPlayer = (SimpleExoPlayer) exoPlayer;
        Log.v(TAG, "onDID_SET_VIDEO: ExoPlayer = " + simpleExoPlayer);
      }
    }
  }
});
For an example of modifying the AudioAttribute property for the ExoPlayer, see the Setting AudioAttributes on Exoplayer Instance forum post.
Getting URL for thumbnail images
You may want to use the thumbnail or video still images from your Brightcove library. Use the following code to get the URL for your images:
For Video Cloud customers using the Edge Catalog (com.brightcove.player.edge.Catalog), you can get the thumbnail URL like this:
String thumbnailUrl = video.getProperties().get("thumbnail").toString();
If you find that the thumbnail image is too small, you can get the video still image instead:
String videoStillUrl = video.getProperties().get("stillImageUri").toString();
Google analytics
If you use the Brightcove player and the catalog class, video analytics will be automatically collected and will appear in your Video Cloud Analytics module. For additional metrics, you can add Google Analytics to your app.
To integrate Google Analytics with your app, follow these steps:
- Add the Google Services plugin to your project.
- Get a Google configuration file and add it to your project.
- Extend the Application and provide a helper method that returns your applications tracker. It should look similar to the google-services AnalyticsApplication.
- In a separate class which extends the BrightcovePlayer, obtain the shared tracker instance:
// Obtain the shared Tracker instance AnalyticsApplication application = (AnalyticsApplication) getApplication(); tracker = application.getDefaultTracker(); - Override appropriate methods to log screen changes and/or send custom events for tracking.
For detailed steps, see Google's document to Add Analytics to Your Android App.
Loading a remote video and poster image
Brightcove Player only customers use video assets from a remote server. Follow these steps to load a video and a poster image, both residing on a remote server:
-
In the
onCreate()method, after defining the video view, create a video object from your video hosted on a remote server. Set theDeliveryTypeto match the type of video you have.Video video = Video.createVideo("https://sdks.support.brightcove.com/assets/videos/hls/greatblueheron/greatblueheron.m3u8", DeliveryType.HLS); -
Load a remote image to be used as the poster image before video playback starts.
try { java.net.URI myposterImage = new java.net.URI("https://solutions.brightcove.com/bcls/assets/images/Great-Blue-Heron.png"); video.getProperties().put(Video.Fields.STILL_IMAGE_URI, myposterImage); } catch (URISyntaxException e) { e.printStackTrace(); } -
Add the video to the view and start video playback.
brightcoveVideoView.add(video); brightcoveVideoView.start(); -
Check to be sure your
onCreate()method appears as follows:@Override protected void onCreate(Bundle savedInstanceState) { super.onCreate(savedInstanceState); setContentView(R.layout.activity_main); brightcoveVideoView = (BrightcoveExoPlayerVideoView) findViewById(R.id.brightcove_video_view); // Optional: For Brightcove Player customers to register their apps Analytics analytics = brightcoveVideoView.getAnalytics(); analytics.setAccount("your account Id"); // Define a video from a remote server Video video = Video.createVideo("https://sdks.support.brightcove.com/assets/videos/hls/greatblueheron/greatblueheron.m3u8", DeliveryType.HLS); // Load a remote poster image try { java.net.URI myposterImage = new java.net.URI("https://solutions.brightcove.com/bcls/assets/images/Great-Blue-Heron.png"); video.getProperties().put(Video.Fields.STILL_IMAGE_URI, myposterImage); } catch (URISyntaxException e) { e.printStackTrace(); } // Add video to the view brightcoveVideoView.add(video); // Start video playback brightcoveVideoView.start(); }
Manually adding DRM content
As a Brightcove Player customer, you may want to use DRM protected content from your own server. You can manually load DRM content as follows:
import com.brightcove.player.display.WidevineMediaDrmCallback;

Video video = Video.createVideo("https://storage.googleapis.com/wvmedia/cenc/h264/tears/tears.mpd");
video.getProperties().put(WidevineMediaDrmCallback.DEFAULT_URL, "https://proxy.uat.widevine.com/proxy?video_id=&provider=widevine_test");
brightcoveVideoView.add(video);
brightcoveVideoView.start();
Methods: synchronous or asynchronous?
Here are some of the asynchronous methods found in the Native Player SDK for Android:
- The
start(),seekTo()andstopPlayback()methods are asynchronous, because they emit an event for other components in the system to handle. - The
clear()method is synchronous with respect to updating the list, but it's asynchronous with respect to unloading the current video.
Mute/unmute the player
You can programmatically mute or unmute the player. Brightcove recommends using the BrightcoveExoPlayerVideoView whenever possible.
BrightcoveExoPlayerVideoView
When using the BrightcoveExoPlayerVideoView, you can programmatically mute or unmute the player by doing the following:
float volume = 100F;
...
brightcoveVideoView.getEventEmitter().on(EventType.DID_SET_VIDEO, new EventListener() {
  @Override
  public void processEvent(Event event) {
    setMute(true);
    brightcoveVideoView.start();
  }
});
...
private void setMute(boolean mute) {
  volume = mute ? 0F : 100F;
  Map<String, Object> properties = new HashMap<>();
  properties.put(Event.VOLUME, volume);
  brightcoveVideoView.getEventEmitter().emit(EventType.SET_VOLUME, properties);
}
Offline playback with DRM
For videos downloaded for offline playback, the download status can also be shown in the Notification Area. The notification title is set to the video title. The notification is removed if the download is paused or cancelled.
| Download status | Notification content text | Notification icon |
|---|---|---|
| Downloading | R.string.odrm_download_running - this is "Downloading…" by defaultThere will be a progress bar showing the percent complete. |
The platform-default animated "downloading" icon - android.R.drawable.stat_sys_download |
| Retry | R.string.odrm_download_waiting_retry - this is "Waiting retry..." by default |
|
| Failed | R.string.odrm_download_failed - this is "Failed!"" by default |
|
| Completed | R.string.odrm_download_complete - this is "Saved" by default |
The platform-default static "downloaded" icon - android.R.drawable.stat_sys_download_done |
For a status of Retry or Failed, the notification subtext will be set to an appropriate resource based on the error type. Here is the full list:
R.string.odrm_error_noneR.string.odrm_error_cannot_resumeR.string.odrm_error_device_not_foundR.string.odrm_error_file_already_existsR.string.odrm_error_file_errorR.string.odrm_error_http_data_errorR.string.odrm_error_insufficient_spaceR.string.odrm_error_too_many_redirectsR.string.odrm_error_unhandled_http_codeR.string.odrm_error_unknown
Paging with the Playback API
When retrieving your Video Cloud content from the Playback API, you can implement paging for a playlist.
To page through a set of videos in a playlist, use the following request URL parameters:
limit- defines the number of videos to return from the Playback APIoffset- sets the number of videos to skip in a playlist from the Playback API
The query parameters will be passed to the Catalog method as a Map object, as key-value pairs. This example returns 6 videos starting with the 10th video in the playlist:
Map<String, String> queryParameters = new HashMap<>();
queryParameters.put("limit", "6");
queryParameters.put("offset", "9");

Catalog catalog = new Catalog(eventEmitter, "myAccount", "myPolicy");
catalog.findPlaylistByID("myPlaylistId", null, queryParameters, myListener);
Playing local videos
If you want to play MP4 videos that are stored locally, then you should save them in the application asset folder.
Uri video = Uri.parse("file:///android_asset/path/to/video.mp4");
brightcoveVideoView.add(Video.createVideo(video.toString()));
brightcoveVideoView.start();
Positioning player controls on the bottom
By default, the player control bar is positioned directly below the video, as shown here:
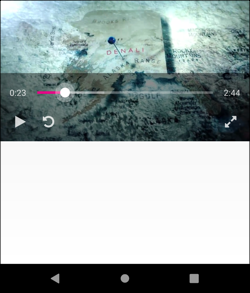
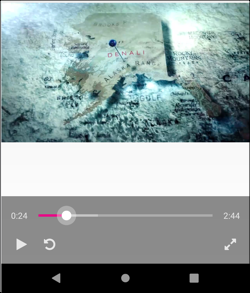
You can also position the player control bar so that it is on the bottom of the video view. Because the controls are part of the BrightcoveVideoView, by setting the height to match_parent, the view will cover the whole screen. When the controls appear in the bottom of the view, the video will remain in the middle of the view.
There are two ways you can do this. The first approach follows:
- Open the main/res/values/style.xml file for your project.
-
Add the following XML code:
<style name="BrightcoveControlBar" parent="BrightcoveControlBarDefault">
  <item name="brightcove_align">false</item>
</style>
Or, you can use code within the MainActivity.java file as follows:
- Open the MainActivity.java file for your project.
-
After you get the event emitter, as shown here:
EventEmitter eventEmitter = brightcoveVideoView.getEventEmitter();Add the following event listener and code. We are waiting until after the
DID_SET_VIDEOevent to ensure the control bar has been created.eventEmitter.on(EventType.DID_SET_VIDEO, new EventListener() { @Override public void processEvent(Event event) { BrightcoveControlBar brightcoveControlBar = brightcoveVideoView.getBrightcoveMediaController().getBrightcoveControlBar(); brightcoveControlBar.setAlign(false); } });
Preload IMA ads
To preload ads using the Native SDK for Android and the IMA plugin, use the setEnablePreloading(true) property .
To use this property, follow these steps:
-
The starting point is the IMA sample app.
-
Locate the
private void setupGoogleIMA()function. -
Add the snippet code block before the last code line of the function.
ImaSdkSettings imaSdkSettings = sdkFactory.createImaSdkSettings(); AdsRenderingSettings adsRenderingSettings = ImaSdkFactory.getInstance().createAdsRenderingSettings(); adsRenderingSettings.setEnablePreloading(true); -
Add the
adsRenderingSettingsparameter to the last code line.googleIMAComponent = new GoogleIMAComponent(brightcoveVideoView, eventEmitter, true, adsRenderingSettings);
Seek without ads
You can use the adsDisabled property for the VideoPlaybackController to disable ad playback while you are seeking through a video.
To use this feature, follow these steps:
-
Get the
VideoPlaybackControllerinstance from theBrightcoveVideoView.VideoPlaybackController playbackController = brightcoveVideoView.getPlaybackController(); -
Disable ad playback.
playbackController.setAdsDisabled(true); - Seek to the desired time position in the current video.
-
Resume normal ad behavior.
playbackController.setAdsDisabled(false);
Your code should look something like this:
final VideoPlaybackController playbackController = brightcoveVideoView.getPlaybackController();
eventEmitter.on(EventType.VIDEO_DURATION_CHANGED, new EventListener() {
  @Override
  public void processEvent(final Event event) {
    playbackController.setAdsDisabled(true);
    brightcoveVideoView.seekTo(10000);
  }
});

eventEmitter.on(EventType.DID_SEEK_TO, new EventListener() {
  @Override
  public void processEvent(final Event event) {
    playbackController.setAdsDisabled(false);
  }
});
Setting the buffer size
You may consider increasing the buffer length to eliminate buffering in the player if the delivery of the next segment is delayed from the CDN. But, you may not be able to do anything better manually that HLS already does.
HLS is designed to play right away and drop quality if it can't keep up. This way, it does not need to preload a buffer. If it can't keep up, it will load as much of the video as it can at the best quality to prevent interruption.
Starting with the Native SDK for Android v6.3.1, the following classes were added to the SDK for the ExoPlayer 2 implementation:
LoadControlConfigAllocatorConfig
The values set in these classes are used to create the ExoPlayer DefaultLoadControl object, which is used to create the ExoPlayer instance. Developers can control the buffer size as follows:
-
The
LoadControlConfigandAllocatorConfigclasses follow the Builder patterns. Values you can set in both classes reflect the values you can set in their constructors.AllocatorConfig allocatorConfig = new AllocatorConfig.Builder().build(); LoadControlConfig loadControlConfig = new LoadControlConfig.Builder() .setAllocatorConfig(allocatorConfig) .setMinBufferMs(X) .setMaxBufferMs(Y) .build(); -
Values not set in the builder will use default values. Use the
ExoPlayerVideoDisplayerComponent.setLoadControlConfig()method to set theLoadControlConfig.brightcoveVideoView = (BrightcoveExoPlayerVideoView) findViewById(R.id.brightcove_video_view); ... ExoPlayerVideoDisplayComponent dc = (ExoPlayerVideoDisplayComponent) brightcoveVideoView.getVideoDisplay(); dc.setLoadControlConfig(loadControlConfig);
Setting captions and themes
Currently, the BrightcoveCaptionPropertiesActivity is set in the Brightcove Player SDK’s manifest file, so developers don’t need to specify it in their applications:
<?xml version="1.0" encoding="utf-8"?>
<manifest
xmlns:android="http://schemas.android.com/apk/res/android"
package="com.brightcove.player"
android:versionCode="1"
android:versionName="1.0">

<application>
<!-- If we don't register this Activity in the Manifest, apps using the SDK will crash when they try to access it. -->
<!-- During the app's build process, this manifest will be merged with the app-level one. -->
<activity android:name="com.brightcove.player.captioning.BrightcoveCaptionPropertiesActivity"/>
</application>
</manifest>
The BrightcoveCaptionPropertiesActivity will inherit the platform default theme, as long as you set themes for your app at the <activity> level in your app’s manifest.
If you set a single app theme at the <application> level, then the BrightcoveCaptionPropertiesActivity will inherit the properties of this application-level theme. For some themes, this can cause the activity to look oddly styled or even illegible.
In those cases, you should specify the BrightcoveCaptionPropertiesActivity in your own manifest and apply a theme there, like so:
<activity
android:name="com.brightcove.player.captioning.BrightcoveCaptionPropertiesActivity"
android:theme="@style/MyCustomCaptionSettingsTheme"/>
Setting default captions
If your video uses multiple language captions, you can programmatically set a default language when playback starts. Your code should look similar to this:
brightcoveVideoView.getEventEmitter().once(EventType.CAPTIONS_LANGUAGES, new EventListener() {
  @Override
  public void processEvent(Event event) {
    brightcoveVideoView.setClosedCaptioningEnabled(true);
    brightcoveVideoView.setSubtitleLocale("fr");
  }
});
Using in-manifest captions
By default, a player built with the Native SDK for Android will use sidecar captions. These captions are found in the text_tracks object of the Playback API response.
To configure the player to use in-manifest captions, the CAPTION_SOURCES property must be removed from the Video object:
if (video.getProperties().get(Video.Fields.CAPTION_SOURCES) != null) {
    video.getProperties().remove(Video.Fields.CAPTION_SOURCES);
}
Setting the peak bitrate
To help you implement a bitrate selector in your player, you can use the following code to set the peak bitrate:
((ExoPlayerVideoDisplayComponent) videoView.getVideoDisplay()).setPeakBitrate(bitRate);
Setting the playback rate
The ExoPlayer supports playback speed adjustment for videos playing on Android devices. For details, see Google's Variable speed playback with ExoPlayer document.
You can control the playback speed with the following code:
eventEmitter.on(EventType.DID_PLAY, new EventListener() {
  @Override
  public void processEvent(Event event) {

    //Get instance of ExoPlayer2
    ExoPlayerVideoDisplayComponent displayComponent = (ExoPlayerVideoDisplayComponent) brightcoveVideoView.getVideoDisplay();
    ExoPlayer exoPlayer = displayComponent.getExoPlayer();

    //Set playback speed
    PlaybackParameters param = new PlaybackParameters(1.6f, 1.0f);
    exoPlayer.setPlaybackParameters(param);
  }
});
Setting VR Goggles mode for 360° videos
When playing a 360° video, users can select the Video 360 button on the control bar to switch to VR Goggles mode. If you are using either the BrightcovePlayer or BrightcovePlayerFragment activity, then the screen orientation will change to landscape when VR Goggles mode is enabled.
If you are using a custom activity, then you will need to add the following:
brightcoveVideoView.getEventEmitter().on(EventType.CHANGE_ORIENTATION, new EventListener() {
  @Override
  public void processEvent(Event event) {
    int orientation = event.getIntegerProperty(Event.REQUESTED_ORIENTATION);
    setRequestedOrientation(orientation);
  }
});
Showing/ hiding video still images
The default behavior when retrieving videos from your Video Cloud library is to display the video still image until playback begins.
Showing the video still image
You can show the video still at any time by emitting a SET_VIDEO_STILL event with a VIDEO_STILL property set to the URI of the video still.
Hiding the video still image
If you are autoplaying the video, you may want to hide the video still image. To do this, you can listen for the SET_VIDEO_STILL event and prevent the default behavior as follows:
brightcoveVideoView.getEventEmitter().on(EventType.SET_VIDEO_STILL, new EventListener() {
  @Override
  public void processEvent(Event event) {
    event.preventDefault();
    event.stopPropagation();
  }
});
Showing player controls
By default, the player controls will disappear after a few seconds. The user can show the controls by tapping on the video.
If you want player controls to remain showing until the user taps on the video, you can disable the automatic hiding function as follows: (the code needed is highlighted)
public class MainActivity extends BrightcovePlayer {
  private BrightcoveMediaController controller;

  @Override
  protected void onCreate(Bundle savedInstanceState) {
    setContentView(R.layout.activity_main);
    brightcoveVideoView = (BrightcoveExoPlayerVideoView) findViewById(R.id.brightcove_video_view);

    controller = new BrightcoveMediaController(brightcoveVideoView);
    controller.setShowHideTimeout(0);

    super.onCreate(savedInstanceState);
Start playback in the middle of a video
Sometimes, you may need to start playback from somewhere in the middle of the video. To do this, you can call BrightCoveVideoView.seekTo() before starting playback.
catalog.findVideoByID(getString(R.string.videoId), new VideoListener() {
  @Override
  public void onVideo(Video video) {
    Log.v(TAG, "onVideo: video = " + video);

    brightcoveVideoView.getEventEmitter().on(EventType.DID_SET_VIDEO, new EventListener() {
    @Override
      public void processEvent(Event event) {
      brightcoveVideoView.seekTo(60000);
      brightcoveVideoView.start();
      }
    });
  brightcoveVideoView.add(video);
  brightcoveVideoView.pause();
  }
});
Start playback when in view
This example will help you to create code to start video playback when the player is in-view and stop playback when it's out-view.
Single videos
The code below shows how to determine if the view is onScreen, offScreen, or partiallyVisible. For more details, see this Android blog post.
    Rect globalVisibilityRectangle = new Rect(); brightcoveVideoView.getGlobalVisibleRect(globalVisibilityRectangle);
  int visibleHeight = globalVisibilityRectangle.right - globalVisibilityRectangle.left;
  int visibleWidth = globalVisibilityRectangle.bottom - globalVisibilityRectangle.top;
  int actualHeight = brightcoveVideoView.getMeasuredHeight();
  int actualWidth = brightcoveVideoView.getMeasuredWidth();
  //if video is on screen: visibleHeight == actualHeight
  //if video is partially Visible: visibleHeight < actualHeight && visibleHeight > 0
  //if video is off screen: visibleHeight < actualHeight && visibleHeight <= 0
Playlist
With a playlist of videos, you will have a player view for each video in the playlist. When a user scrolls a player some percentage into view, that player will start video playback. Players scrolled out of view will stop playing.
For a code sample for managing the video views, see the AdapterView in the Android SDK VideoListSampleApp.
AdapterView.java
  package com.brightcove.recyclervideoview;

    import android.content.Context;
    import androidx.annotation.NonNull;
    import androidx.annotation.Nullable;
    import androidx.recyclerview.widget.RecyclerView;

    import android.view.LayoutInflater;
    import android.view.View;
    import android.view.ViewGroup;
    import android.widget.FrameLayout;
    import android.widget.TextView;

    import com.brightcove.player.event.Event;
    import com.brightcove.player.event.EventEmitter;
    import com.brightcove.player.event.EventListener;
    import com.brightcove.player.event.EventType;
    import com.brightcove.player.model.Video;
    import com.brightcove.player.view.BrightcoveExoPlayerVideoView;
    import com.brightcove.player.view.BrightcoveVideoView;

    import java.util.ArrayList;
    import java.util.List;

    public class AdapterView extends RecyclerView.AdapterAdapterView.ViewHolder {

        private final ListVideo videoList = new ArrayList();

        @Override
        public ViewHolder onCreateViewHolder(ViewGroup parent, int viewType) {
            View view = LayoutInflater.from(parent.getContext()).inflate(R.layout.item_view, parent, false);
            return new ViewHolder(view);
        }

        @Override
        public void onBindViewHolder(ViewHolder holder, int position) {
            //Get Video information
            Video video = videoList == null ? null : videoList.get(position);
            if (video != null) {
                holder.videoTitleText.setText(video.getStringProperty(Video.Fields.NAME));
                BrightcoveVideoView videoView = holder.videoView;
                videoView.clear();
                videoView.add(video);
            }
        }

        @Override
        public int getItemCount() {
            return videoList.size();
        }

        @Override
        public void onAttachedToRecyclerView(RecyclerView recyclerView) {
            super.onAttachedToRecyclerView(recyclerView);
        }

        @Override
        public void onViewAttachedToWindow(ViewHolder holder) {
            super.onViewAttachedToWindow(holder);
            holder.videoView.start();
        }

        @Override
        public void onViewDetachedFromWindow(ViewHolder holder) {
            super.onViewDetachedFromWindow(holder);
            holder.videoView.stopPlayback();
        }

        @Override
        public void onDetachedFromRecyclerView(RecyclerView recyclerView) {
            super.onDetachedFromRecyclerView(recyclerView);
            int childCount = recyclerView.getChildCount();
            //We need to stop the player to avoid a potential memory leak.
            for (int i = 0; i < childCount; i++) {
                ViewHolder holder = (ViewHolder) recyclerView.findViewHolderForAdapterPosition(i);
                if (holder != null && holder.videoView != null) {
                    holder.videoView.stopPlayback();
                }
            }
        }

        public void setVideoList(@Nullable ListVideo videoList) {
            this.videoList.clear();
            this.videoList.addAll(videoList);
            notifyDataSetChanged();
        }

        public class ViewHolder extends RecyclerView.ViewHolder {

            public final Context context;
            public final TextView videoTitleText;
            public final FrameLayout videoFrame;
            public final BrightcoveVideoView videoView;

            public ViewHolder(@NonNull View itemView) {
                super(itemView);
                context = itemView.getContext();
                videoFrame = (FrameLayout) itemView.findViewById(R.id.video_frame);
                videoTitleText = (TextView) itemView.findViewById(R.id.video_title_text);
                videoView = new BrightcoveExoPlayerVideoView(context);
                videoFrame.addView(videoView);
                videoView.finishInitialization();

                EventEmitter eventEmitter = videoView.getEventEmitter();
                eventEmitter.on(EventType.ENTER_FULL_SCREEN, new EventListener() {
                    @Override
                    public void processEvent(Event event) {
                        //You can set listeners on each Video View
                    }
                });
            }
        }
    }
Swapping videos
This example shows one approach for swapping videos in the player.
Single videos
Since the clear() method is asynchronous when unloading the current video, you need to wait before adding a new video to the player. Here are two options.
-
Since the time to fetch a video from Video Cloud should dwarf the time to update the playlist, you can try something like this:
brightcoveVideoView.clear(); catalog.findVideoByID("123456789", new VideoListener() { @Override public void onVideo(final Video video) { brightcoveVideoView.add(video); brightcoveVideoView.start(); } }); -
Another approach is to wait for an event:
catalog.findVideoByID("", new VideoListener() {
@Override
  public void onVideo(final Video video) {
    eventEmitter.once(EventType.DID_CHANGE_LIST, new EventListener() {
    @Override
    public void processEvent(Event event)
    	{ brightcoveVideoView.add(video); brightcoveVideoView.start(); }
  });
  brightcoveVideoView.clear();
  }
});
Playlist
If you are working with a playlist, keep in mind that calling the clear() method removes all the elements of the playlist. So, you may get an IndexOutOfBounds exception when trying to jump to the first video in the playlist.
Instead, you can try something like this:
brightcoveVideoView.pause();
brightcoveVideoView.stopPlayback();
brightcoveVideoView.setCurrentIndex(0);
Switching between videos in a playlist
If you are using a playlist, you can use the following code to switch between videos in the playlist:
private void setupControls(List<Video> videos) {
  previousVideoButton = (Button) findViewById(R.id.previous_video_button);
  nextVideoButton = (Button) findViewById(R.id.next_video_button);

  if (videos != null) {
    previousVideoButton.setEnabled(false);
    previousVideoButton.setOnClickListener(new View.OnClickListener() {
    public void onClick(View view) {
    int index = brightcoveVideoView.getCurrentIndex();
    int size = brightcoveVideoView.getList().size();
    previousVideoButton.setEnabled(index > 1);
    nextVideoButton.setEnabled((index + 1) < size);

    if (index > 0) {
    brightcoveVideoView.setCurrentIndex(index - 1);
    }
  }
});

nextVideoButton.setEnabled(videos.size() > 1);
nextVideoButton.setOnClickListener(new View.OnClickListener() {
  public void onClick(View view) {
    int index = brightcoveVideoView.getCurrentIndex();
    int size = brightcoveVideoView.getList().size();
    previousVideoButton.setEnabled(index >= 0);
    nextVideoButton.setEnabled((index + 2) < size);

    if ((index + 1) < size) {
    	brightcoveVideoView.setCurrentIndex(index + 1);
    }
  }
});
}
}